Creating an onboarding screen for your app can help set your users up for success. You can give your users a chance to get information about your app they may not have gotten from the download page (which can often limit the amount of information). Or you can give your users reasons for certain permissions.
Onboard screens are often an afterthought in most apps because they are only seen once when your app is first launched. However, they can provide a significant amount of value to your app.
Since onboarding screens have such limited scope, developers tend to offload the implementation to some external library.
In this tutorial, you’ll go over creating a simple onboarding screen for iOS using Swift that can be used in any orientation, and on both phones and tablets. Moreover, you’ll create the screen programmatically instead of depending on Storyboards.
Listing Key Features of an Onboarding Screens
At the bare minimum, onboarding screens contain the following
Title A subtitle or description A hero image, a next A next button Swipe-able pages An indicator showing the number of pages with the current page highlighted Optionally a Skip button As an example. Here’s what a typical onboarding screen might look like
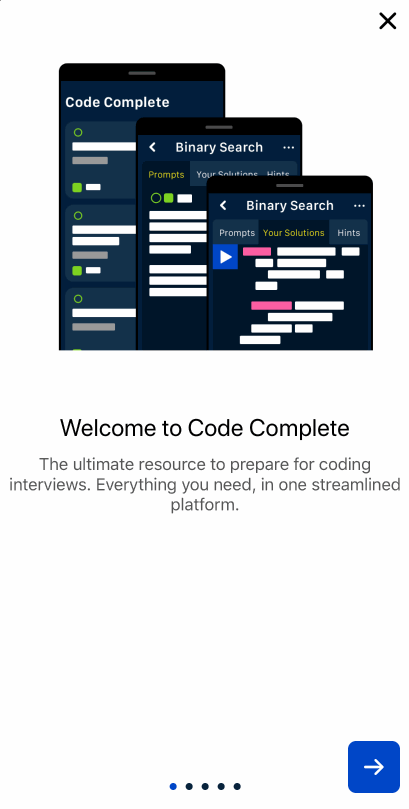
You can see some of the highlighted features in the above image.
Instinct might say that a View like this should be created with some kind of UIScrollView. However, in this tutorial, you’ll create this view by creating a horizontal paging view root container using a UICollectionView.
Creating a Horizontal Paging View
Start by creating a new class for the paging view. In this tutorial, it’ll be called HorizontalPageView.
class HorizontalPageView: UICollectionView, UICollectionViewDelegateFlowLayout, UICollectionViewDataSource {
  private let content: [UIView]
  init(content: [UIView]) {
    self.content = content
    let layout = UICollectionViewFlowLayout()
    layout.scrollDirection = .horizontal
    super.init(frame: .zero, collectionViewLayout: layout)
    translatesAutoresizingMaskIntoConstraints = false
  }
}
You first extend UICollectionView, and implement UICollectionViewDelegateFlowLayout both UICollectionViewDataSource. You could put them as extension on the class, however, it was put here for brevity. Note that the paging view will accept and store a list of pages in the content variable. Notice that the pages are simply UIViews, which means, you can put anything in this paging view.
Next you create an instance of UICollectionViewFlowLayout, and initialize the scroll direction to horizontal. Finally you pass this parameter into the super constructor. Finally, you set translatesAutoresizingMaskIntoConstraints to false, so that it plays nice with Auto-layout.
Next, the following parameter should be added in the same constructor method
  init(content: [UIView]) {
    // ..... All the stuff from above
    isPagingEnabled = true
    showsVerticalScrollIndicator = false
    showsHorizontalScrollIndicator = false
    delegate = self
    dataSource = self
    register(PageViewCellView.self, forCellWithReuseIdentifier: "cell")
  }
Now the key parameter here is isPagingEnabled, which is set to true. The next two parameters are mostly for aesthetics. The next two parameters will allow you to configure the data and the look of the collection view. And finally, you’ll register the cell view with a reuse identifier named “cell”. In this case, you’ll name the view PageViewCellView, you’ll visit this class soon.
Next, add the following method in the methods to satisfy the UICollectionViewDataSource protocol.
  func collectionView(_ collectionView: UICollectionView, numberOfItemsInSection section: Int) -> Int {
    content.count
  }

  func collectionView(_ collectionView: UICollectionView, cellForItemAt indexPath: IndexPath) -> UICollectionViewCell {
    let cell = collectionView.dequeueReusableCell(withReuseIdentifier: "cell", for: indexPath) as! PageViewCellView
    let content = self.content[indexPath.row]
    cell.fill(view: content)
    return cell
  }
The first method is self explanatory, it simply establishes the number of pages. The second method is also pretty trivial. It dequeues a cell and returns it to the collection view. The only interesting part of the method here is where the fill(view: UIView) method is called. You’ll see this when you implement the PageViewCellView.
Finally, the last method that makes this work is defining the size of the cells. Add the following method underneath the above two
public func collectionView(_ collectionView: UICollectionView, layout collectionViewLayout: UICollectionViewLayout, sizeForItemAt indexPath: IndexPath) -> CGSize {
  return CGSize(width: collectionView.frame.width, height: collectionView.frame.height)
}
The idea is, you want each page to take up as much page as the collection view itself. Therefore you return a CGSize that uses the collection view’s frame directly.
OK, with the collection view done, time to take a look at the cell itself.
Creating the Collection View Cell
In the previous section, you created the paging view using a UICollectionView. In this section, you’ll create the cell class. Create a new class named PageViewCellView
class PageViewCellView: UICollectionViewCell {
  override init(frame: CGRect) {
    super.init(frame: frame)
    translatesAutoresizingMaskIntoConstraints = false
  }
}
Nothing exciting here. You create a class that extends UICollectionViewCell with the default constructor, however, you set translatesAutoresizingMaskIntoConstraints to false so things work well with auto-layout.
Next you’ll add the method alluded to in the previous section.
func fill(view content: UIView) {
  subviews.forEach { $0.removeFromSuperview() }

  addSubview(content)
  NSLayoutConstraint.activate([
    content.topAnchor.constraint(equalTo: topAnchor),
    content.bottomAnchor.constraint(equalTo: bottomAnchor),
    content.leadingAnchor.constraint(equalTo: leadingAnchor),
    content.trailingAnchor.constraint(equalTo: trailingAnchor),
  ])
}
This method simply removes any previous views that may have been in the cell, and replaces it with a new view that takes up the entire cell. Recall that we defined each cell to take up the entire size of collection view.
With the collection view and cell complete. You now have a horizontal paging view which you can drop into your app. However, in the next section, you’ll continue to build the onboarding screen by using the paging view and adding some of the other key features that make up an onboarding view.
Creating Onboarding Content
You’re free to design the content in your onboarding screen that best suits your app. In this tutorial. you’ll create a placeholder content view that contains all key features from the first section.
Here’s a wireframe of what the content will look like
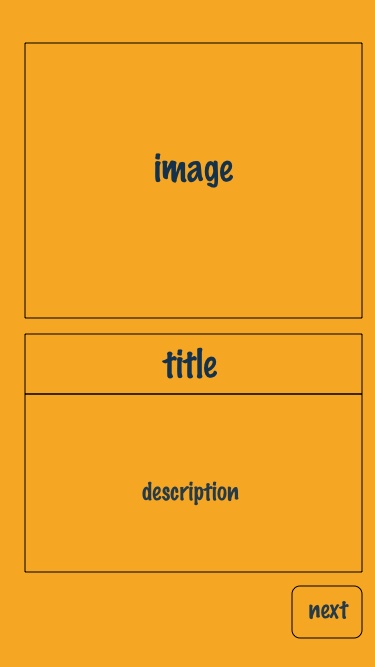
Pretty straight forward, however, notice that in this wireframe, the “next” button was added to the content view. You could add the button directly on the onboarding view (which we’ll create later), however, in this tutorial, it’ll be added to the content directly.
Recall, that the PagingView accepts a list of these content views, as long as they subclass UIView. So although the content view you will be creating will be read-only, you’re free to augment the view with any type of content that suits your app.
Below is a copy of a class that creates the above wireframe:
class PageView: UIView {
  let nextButton: UIButton = ...
  init(
    title: String,
    subtitle: String,
    image: UIImage?
  ) {
  super.init()
  let pageTitle: UILabel= ...
  pageTitle.numberOfLines = 1
  pageTitle.textAlignment = .center

  let pageSubtitle: UILabel = ...
  pageSubtitle.numberOfLines = 0
  pageSubtitle.textAlignment = .center

  let pageImage: UIImageView = ...
  pageImage.contentMode = .scaleAspectFit

  let actionContainer: UIView = ...
  actionContainer.addSubview(nextButton)

  let topView: UIView = ...
  topView.addSubview(pageImage)

  let bottomView: UIView = ...
  bottomView.addSubview(pageTitle)
  bottomView.addSubview(pageSubtitle)
  bottomView.addSubview(actionContainer)

  addSubview(topView)
  addSubview(bottomView)

  NSLayoutConstraint.activate([
    topView.topAnchor.constraint(equalTo: topAnchor),
    topView.leadingAnchor.constraint(equalTo: leadingAnchor),
    topView.trailingAnchor.constraint(equalTo: trailingAnchor),
    topView.heightAnchor.constraint(equalTo: heightAnchor, multiplier: 0.5),

    bottomView.topAnchor.constraint(equalTo: topView.bottomAnchor),
    bottomView.leadingAnchor.constraint(equalTo: leadingAnchor),
    bottomView.trailingAnchor.constraint(equalTo: trailingAnchor),
    bottomView.bottomAnchor.constraint(equalTo: bottomAnchor),

    pageTitle.topAnchor.constraint(equalTo: bottomView.topAnchor, constant: 12),
    pageTitle.leadingAnchor.constraint(equalTo: bottomView.leadingAnchor, constant: 8),
    pageTitle.trailingAnchor.constraint(equalTo: bottomView.trailingAnchor, constant: -8),

    pageSubtitle.topAnchor.constraint(equalTo: pageTitle.bottomAnchor, constant: 12),
    pageSubtitle.leadingAnchor.constraint(equalTo: bottomView.leadingAnchor, constant: 8),
    pageSubtitle.trailingAnchor.constraint(equalTo: bottomView.trailingAnchor, constant: -8),

    actionContainer.topAnchor.constraint(equalTo: pageSubtitle.bottomAnchor),
    actionContainer.leadingAnchor.constraint(equalTo: bottomView.leadingAnchor),
    actionContainer.trailingAnchor.constraint(equalTo: bottomView.trailingAnchor),
    actionContainer.bottomAnchor.constraint(equalTo: bottomView.bottomAnchor),

    nextButton.widthAnchor.constraint(equalToConstant: 52),
    nextButton.heightAnchor.constraint(equalToConstant: 52),
    nextButton.trailingAnchor.constraint(equalTo: actionContainer.trailingAnchor, constant: -12),
    nextButton.bottomAnchor.constraint(equalTo: actionContainer.bottomAnchor, constant: -12),
  ])
  }
}
The important takeaways from the above view is we pass the necessary titles, subtitle (or description) and image directly in the constructor. Therefore, when you create a PageView, it’ll be pretty obvious what’s included in the page. Here’s an example:
PageView(
  title: "Page Title",
  subtitle: "Enter description of the page",
  image: UIImage(named: "image")
)
Withe content view created. It’s time to turn your attention to the actual onboarding view.
Creating the Onboarding View
With all the pieces in place, it’s time to pull them altogether into the final view. Below is a wireframe of how the pieces will be put together.
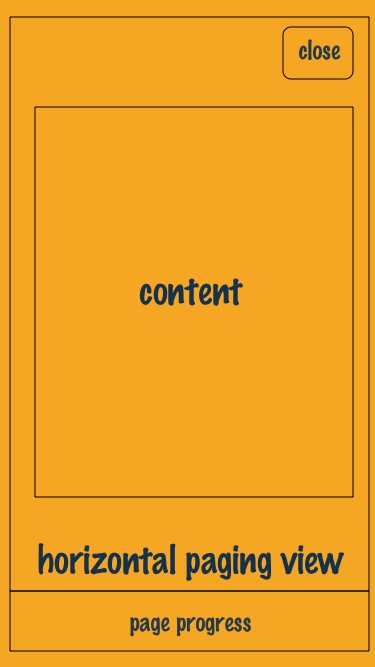
From the wireframe, you can see that you’ll have to create the close or skip button, the horizontal paging view, and the page progress. If you recall when creating the horizontal paging view, you can pass a list of UIViews. In this case, you can create a list of PageView objects created using the class created in the previous section
class OnboardingView: UIViewController {
  init() {
    let close: UIButton = ...
    let content = [PageView(...),  PageView(...), PageView(...), PageView(...)]
    let scroll = HorizontalPageView(content: content)
    let page = UIPageControl(frame: .zero)
    page.translatesAutoresizingMaskIntoConstraints = false
    page.currentPage = 0
    page.numberOfPages = content.count
    view.addSubview(scroll)
    view.addSubview(page)
    view.addSubview(close)
    NSLayoutConstraint.activate([
      close.topAnchor.constraint(equalTo: view.safeAreaLayoutGuide.topAnchor),
      close.trailingAnchor.constraint(equalTo: view.safeAreaLayoutGuide.trailingAnchor),
      close.widthAnchor.constraint(equalToConstant: 48),
      close.heightAnchor.constraint(equalToConstant: 48),

      scroll.topAnchor.constraint(equalTo: view.safeAreaLayoutGuide.topAnchor),
      scroll.leadingAnchor.constraint(equalTo: view.safeAreaLayoutGuide.leadingAnchor),
      scroll.trailingAnchor.constraint(equalTo: view.safeAreaLayoutGuide.trailingAnchor),
      scroll.bottomAnchor.constraint(equalTo: view.safeAreaLayoutGuide.bottomAnchor),
      page.bottomAnchor.constraint(equalTo: view.safeAreaLayoutGuide.bottomAnchor),
      page.leadingAnchor.constraint(equalTo: view.safeAreaLayoutGuide.leadingAnchor),
      page.trailingAnchor.constraint(equalTo: view.safeAreaLayoutGuide.trailingAnchor)
    ])
  }
}
Starting from the top of the class, you extend a UIViewController and use its view as your root container. The important takeaways from the code above is pay attention to the order of the views added to the root view. You need to have the close view added last so that it shows up on top of the view hierarchy.
In the last section, you’ll add the plumbing to move the page forward when the action button in the page content is pressed.
Putting it All Together
Finally, all that remains is connect the next button up from one page view to the next. Paste the following code in your OnboardingView
for (index, item) in content.enumerated() {
  item.nextButton.action = {
    scroll.scrollToItem(at: IndexPath(item: index + 1, section: 0), at: .right, animated: true)
    page.currentPage = index + 1
  }
}
The above code attaches each PageView’s next button to the horizontal paging view, and the page control view. When your users press the next button on each page view, it will automatically scroll to the next page page, while updating the progress.
Finally, you may want to also connect the swiping from each page to update the page control as well. This can be accomplished by going back to the horizontal paging view class, and adding the following code
func scrollViewWillEndDragging(_ scrollView: UIScrollView, withVelocity velocity: CGPoint, targetContentOffset: UnsafeMutablePointer<CGPoint>) {
  let item = Int(targetContentOffset.pointee.x / scrollView.frame.width)
  pageChanged?(item)
}
The above code will notify (thought a delegate named pageChanged), when a page is swiped. It does this by calculating the offset of the width with the entire width of the scroll view’s frame.
In order to update the page control, head back to the OnboardingView and add the following piece of code
scroll.pageChanged = {
  page.currentPage = $0
}
This will keep the page control in sync with the current page.
Takeaways
Hopefully this post showed you how easy it is to create your own onboarding view.
Onboarding your users goes a long way towards giving your users insight into the value of your app, helps expose them to features they might otherwise not know exist, and sets them up for success with your app.
The best book on machine learning for iOS.

Work with CoreML? Then you need MLFairy.com.

Enjoy my content? Consider becoming a member of my patreon, and help me continue making content!