CoreImage was always one of those libraries I knew about, but rarely ever interacted with. That was, until recently when a contract required me to work with CoreImage filters. The client needed a custom filter into their pipeline.
CoreImage is a highly optimized library that can help you apply filters to your images, or allow you to create your own filter using the Metal Shader Language.
In this tutorial, you’ll learn how to create a custom CoreImage filter using Metal Kernels.
Researching CoreImage was a little tricky because there didn’t seem to be much out there outside of the official docs. In practice I believe CoreImage is somewhat of a niche library, used by folks that are looking for a native library to apply some filters to their UIImage.
That might explain why I wasn’t able to find too much information on how to work with CoreImage filters, especially when it came to creating a custom filter. If you’re in the same boat as I was, hopefully this tutorial will help you on your way.
By the end of this tutorial, you should understand how to create your own custom CoreImage filter using the Metal Shader language.
Creating a Pass Through filter
You’ll start by creating a simple pass through filter backed by Metal. Overkill? Possibly. However, there’s some ceremony around setting up your environment, so it’s probably easiest to first get a working set up.
Although this tutorial won’t be going over the Metal Shader Language (MSL) in depth, all you need to know is that its a variant of C++. So if you’re familiar with that language, the kernel we write may look familiar to you. The kernel you’ll write in this tutorial won’t be use any advanced methods.
Note: The instructions described in this tutorial are based on Xcode 11.4.1, with Swift 5.1.
Start by creating a new project in Xcode. Add a new Metal file by selecting File > New > File… Then select “Metal File” as the template for your new file.
Now you should be greeted with a new file, with the metal standard library and the namespace used, included. Append the following to the file
#include <CoreImage/CoreImage.h>
extern "C" {
  namespace coreimage {
    float4 passthroughFilterKernel(sampler src) {
      float4 output = src.sample(src.coord());
      return output;
    }
  }
}
The code shouldn’t look too daunting. The big picture here is, you’ve created a kernel that accepts a source image, plucks out the current pixel and returns that same pixel, effectively acting as a pass-through filter (as the name implies). To make the kernel accessible to CoreImage, you need to create the kernel in the coreimage namespace.
With the Metal file created, next you’ll have to configure your Xcode project to build and include this metal file. Start by accessing your project’s target, and build settings.

Next, search for “Other Metal Compiler Flags”. Enter the value of -fcikernel (note, the hyphen is required). This tells the metal compiler to also include the CoreImage library when compiling the Metal file.
Next, you need to add User-Defined flag. Click the tiny + symbol in Build Settings, and add a flag named MTLLINKER_FLAGS.
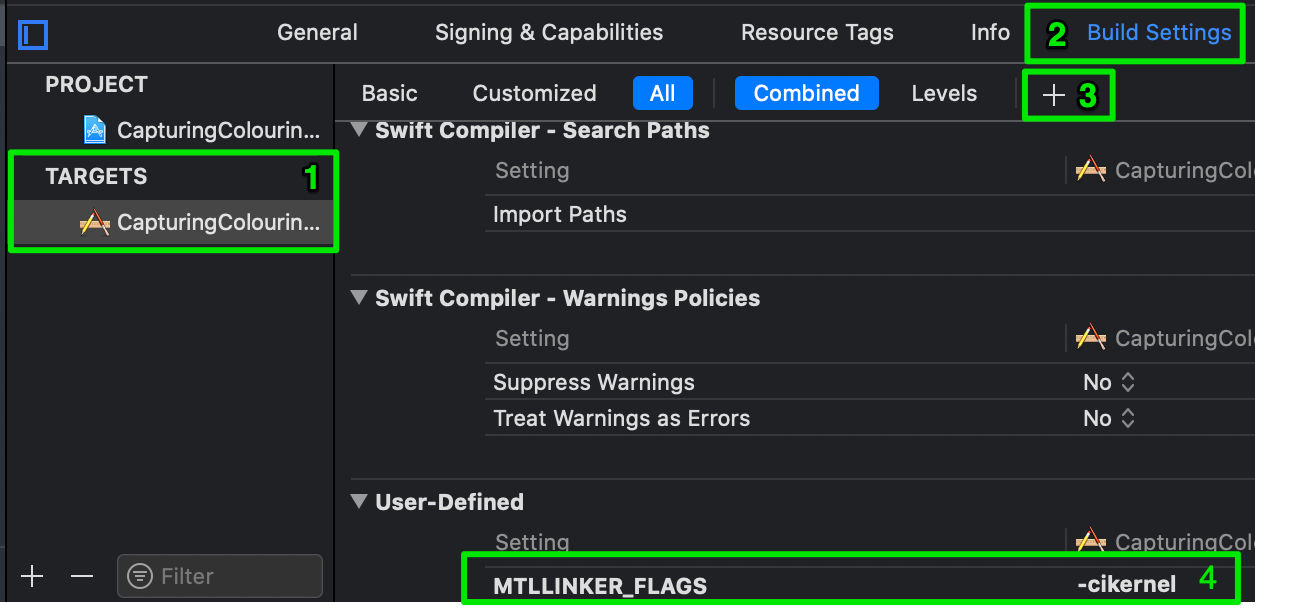
It’s not entirely clear to me why this second flag is required after the first setting was enabled, however it’s required to make all this work.
Ok with the environment setup, next is create a CoreImage filter that uses your pass through filter.
Wrap a Kernel in a Filter
Create a new Swift file and give it a name. In this tutorial. you’ll just name it “Filters”. Change the import so that you’re importing CoreImage instead of Foundation.
Create a new class and make it a subclass of CIFilter. You’ll need to load the kernel from the compiled Metal library. You’ll do this by adding a property to your class of type CIKernel. In this case, you’ll just name the property kernel.
private lazy var kernel: CIKernel = {
  guard let url = Bundle.main.url(forResource: "default", withExtension: "metallib"), let data = try? Data(contentsOf: url) else {
    fatalError("Unable to load metallib")
  }
  let name = "passthroughFilterKernel"
  guard let kernel = try? CIKernel(functionName: name, fromMetalLibraryData: data) else {
    fatalError("Unable to create the CIColorKernel for filter \(name)")
  }
  return kernel
}()
By default the compiled metal files are in the main bundle with the name “default.metallib”. If the file is found, load its content as a Data type, then use that Data to initialize the CIKernel, passing in the name of the method from the previous section.
The code above is pretty harsh when it fails to either load the Metal library or load the kernel. Feel free to add your own fallback code.
Next you’ll create an optional property named inputImage, and override the optional property outputImage (both of CIImage type).
var inputImage: CIImage?
override var outputImage: CIImage? {
  guard let inputImage = inputImage else { return .none }
  return kernel.apply(
    extent: inputImage.extent,
    roiCallback: {(index, rect) -> CGRect in return rect},
    arguments: [inputImage]
  )
}
In the return statement of outputImage, you actually perform the filtering by calling the apply method on the kernel. The apply method requires a few arguments here.
The first argument is the extent, which represents how much of the input image we pass on to the kernel for filtering. In this case, you’ll pass in the whole image.
The second argument is roiCallback, which is a closure that accepts an index, and a CGRect and expects a CGRect to be returned. The purpose to of this closure is for you to answer a question from CoreImage. It’s saying “I’ve got this rectangle of the output image that I want to generate. What area of the input image do I need to provide access to?” This has to do with the way CoreImage slices up the image that it sends to the GPU for optimal processing. In your case, the slice that’s passed in is the same size of the slice that’s going out. So simply return the passed in rect.
The final argument is arguments, which accepts an ordered list of arguments to the Metal kernel. In this case, it’s just the input image.
Using Your New Filter
Now that you’ve created your new CIFilter, it’s time to show it off. Assuming you have a UIImage, you can convert to a CIImage as follows:
let image = UIImage(...)
let inputImage = CIImage(image: image)!
Then, by creating an instance of your filter and setting the input image, you can apply the filter by getting the output image as follows:
let filter = PassthroughFilter()
filter.inputImage = inputImage
let output = filter.outputImage!
To convert the image back to a UIImage, you’ll first need a CIContext, and then draw the image into a CGImage (which, if you’re unfamiliar, is Apple’s low level drawing library), as follows:
let context = CIContext()
let cgImage = context.createCGImage(output, from: output.extent)!
let uiImage = UIImage(cgImage: cgImage)
Creating a Threshold Filter
In this section, you’ll create a threshold filter. What exactly a threshold filter does is actually pretty straight forward. First you’ll go over how it works.
Since we have an RGBA image, which consists of 4 float values, you’ll need to ask yourself what exactly does thresholding mean in this situation? Does it mean you’ll threshold each channel with individual values? Does it mean you’ll threshold all values with the same threshold value? Or does it mean you’ll have to convert the pixel values to some other colour space, and threshold that. TL;DR, it’s the latter.
In this tutorial, you’ll simply compute the luma (or brightness) of the RGB portion of the pixel. Then you’ll threshold that value to determine if it should be a black pixel vs a white pixel.
Go back to your Metal file, and underneath your pass through filter, add the following code
float4 thresholdKernel(sampler src, float threshold) {
  // 1
  float4 input = src.sample(src.coord());
  // 2
  float luma = dot(input.rgb, float3(0.2126, 0.7152, 0.0722));
  // 3
  float value = step(threshold, luma);
  // 4
  float3 rgb = float3(value);
  // 5
  return float4(rgb, input.a);
}
Feel free to name your filter whatever you feel is appropriate, in this case, you’ve named it thresholdKernel. The method accepts the image as a texture (also known as a sampler in the Metal world), and a value to threshold. Each line breaks down as follows:
Get the pixel value to operate on. Use the well known Relative-Luminance formula to compute the brightness of the pixel. Use the built in step function in Metal to determine if the pixel should be 0 or 1. Project the 0 or 1 value into an RGB vector, And return that RGB vector with the original alpha value Technically there’s no reason to return the original alpha value. You could just make the pixel completely opaque. The choice to use the original alpha was simply a preference. Also, brightness values are between 0 – 1, so threshold values should also be limited to that range.
Finally repeat the steps from above to create a new CIFilter, except this time, you’ll need to add a parameter for the threshold. Here’s whatt the full class should look like
class ThresholdFilter: CIFilter {
  private lazy var kernel: CIKernel = {
    guard let url = Bundle.main.url(forResource: "default", withExtension: "metallib"), let data = try? Data(contentsOf: url) else {
      fatalError("Unable to load metallib")
    }

    let name = "thresholdKernel"
    guard let kernel = try? CIKernel(functionName: name, fromMetalLibraryData: data) else { fatalError("Unable to create the CIColorKernel for filter \(name)") }

    return kernel
  }()

  var inputImage: CIImage?
  var threshold: Float = 0.5
  override var outputImage: CIImage? {
    guard let inputImage = inputImage else { return .none }
    return kernel.apply(
      extent: inputImage.extent,
      roiCallback: {(index, rect) -> CGRect in return rect},
      arguments: [inputImage, threshold]
    )
  }
}
You can see that the default value of the threshold was set to 0.5, and the threshold value is passed into the apply method when getting the output image.
Applying the same steps as above to filter the actual image, you can see the results below when applied to one of the provided images on a simulator
Note: Did I mention that CoreImage filters work in a simulator since they added Metal support for simulator, win!
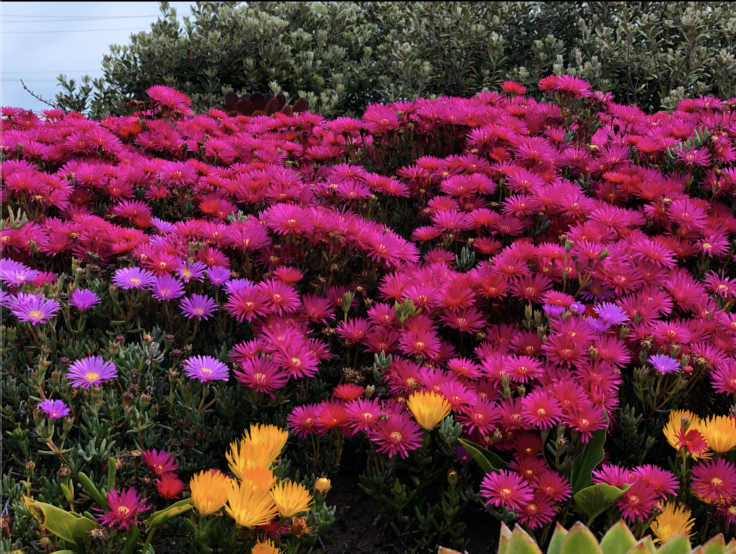
Original Image
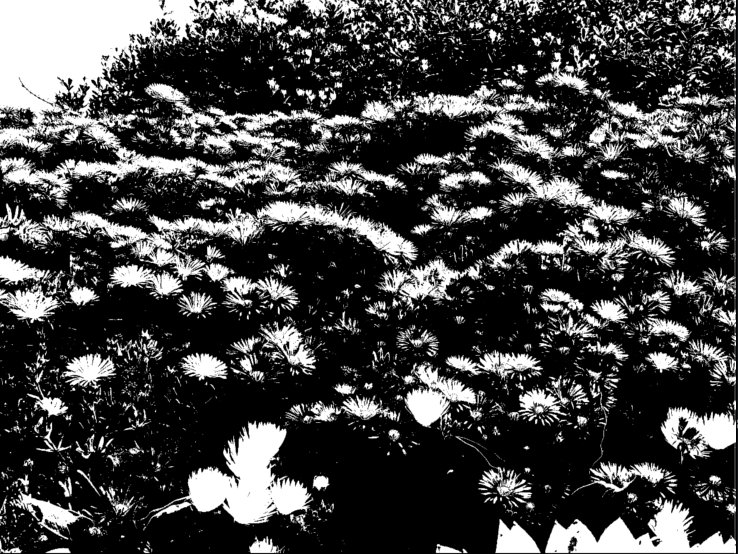
Filtered Image – Threshold value of 0.35
Takeaways
Hopefully you’ve found this look at CoreImage informative. I was genuinely impressed with the CoreImage performance even while developing in the simulator.
I found CoreImage to be surprisingly easy to work with once I managed to add the library along with Metal support into the project.
If you’re interested in creating more filters with Metal, be sure to checkout the Metal Shader language.

The best book on machine learning for iOS.

Work with CoreML? Then you need MLFairy.com.

Enjoy my content? Consider becoming a member of my patreon, and help me continue making content!